Web Socket Lets Chat


Let’s learn about WebSockets. This is another way to communicate from the client to the server, just like short polling and long polling, but it is more commonly used. It supports full-duplex communication. Now you might wonder, what is full-duplex? Full-duplex means data can be transmitted in both directions simultaneously—both parties can send data to each other without any interruption. Here, the parties are the backend and the frontend, or the client and the server.
Unlike short polling and long polling, which rely on HTTP, WebSockets are a completely different technology. It works based on a single, live TCP connection, allowing continuous and bidirectional communication.
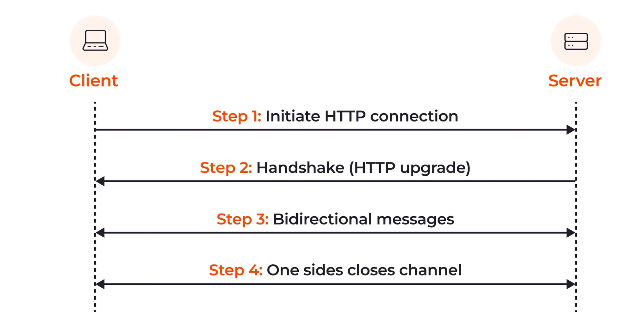
The first handshake happens over an HTTP connection, which is then upgraded to WebSockets using the 101 Switching Protocols method. After this, a new connection is established, and a long-lived TCP connection is maintained. This connection stays open until it is explicitly closed from either the backend or the frontend. During this time, bidirectional data flows continuously.
We will discuss all of this in detail, but first, let’s build something and see it in action.
Code
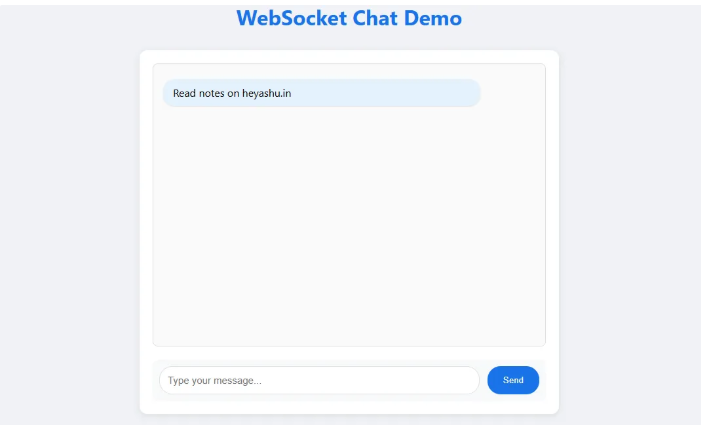
We’ve built a simple chat UI with an input box, a send button, and a section to display messages. However, there are two key problems we need to solve:
- When we type a message, it should be sent to the server.
- Anyone who has opened localhost:3000 should receive the new message without reloading the page. This is the essence of a duplex connection. Messages should flow seamlessly between clients. If someone types a message, it should appear on my screen, and vice versa.
How will we make this possible?
Socket.io / WebSockets
We are going to use Socket.io, a technology designed for bidirectional and low-latency communication across platforms. You can read the documentation by clicking here.
Remember, WebSocket is also available as an NPM library, but here we’ll implement this using Socket.io.
git clone https://github.com/ashumsd7/web-communication-techniques.git
cd web-communication-techniques
npm i
npm run web socket
-------------------
Open browser and type
http://localhost:3000/ // Observe network tab
After installing all the dependencies, you can close the repo. Then, go to this URL: localhost, and your application will be running after executing the following command:
npm run web-sockets
Server Code
If you’ve already installed and run your application, you should be familiar with everything. But if not, here’s the backend code. The backend handles the WebSocket connection to send and receive messages.
const server = http.createServer(app);

// Step 0 : import socket.io
const { Server } = require("socket.io");
// creating Instance of socket.io
const io = new Server(server);

// Step1 : when connection is established
io.on("connection", (socket) => {
  console.log("🚀 Connection Established");

  // Step1a : when we receive a message : Listening for the event
  socket.on("chat-message", (message) => {
    console.log("🚀 Message Received", message);
    // Step1aa : emit the message to all connected clients : Broadcasting the message
    io.emit("chat-message", message);
  });

  // Step1b : when connection is disconnected
  socket.on("disconnect", () => {
    console.log("🚀 Disconnected");
  });
});
Step 0: Imports and Creating the Server
The first step is all about importing the necessary modules and creating a server.
Step 1: Establishing the Connection
When the connection is established, you’ll see "Connection Established" in the console. Inside the callback function where you receive the socket as a parameter, you can listen for messages.
- Step 1a: Use
socket.on('chat-message')to listen for the'chat-message'event. This event name should be the same on the client side while sending the message. We’ll see that client-side code soon. - Step 1aa: Once you receive the message, you can broadcast it to all connected clients using
socket.emit(). This ensures that every client gets notified of the new message. - Step 1b: Finally, handle the disconnection using
socket.on('disconnect'). This will trigger when a connection gets disconnected.
Now, let’s see how it works on the frontend.
Now, let's dive into the code and understand the core logic of WebSockets.
const socket = io();

    console.log("🚀 Socket From frontend", socket);

    function sendMessage() {
      const message = messageInput.value.trim();
      if (message) {
        console.log('Sending message:', message);
        // emiting message to the server
        socket.emit("chat-message", message);
        // Add message to messages div

      }
    }

    // listening for the message from the server :auto receive the message
    socket.on("chat-message", (message) => {
      console.log("🚀 Message Received From Server", message);
      // Add message to messages div
      const messageElement = document.createElement('div');
      messageElement.className = 'message';
      messageElement.textContent = message;
      messagesDiv.appendChild(messageElement);
      // Auto scroll to bottom
      messagesDiv.scrollTop = messagesDiv.scrollHeight;

      // Clear input
      messageInput.value = '';
    });
So, if you look above, you will see that you have one active connection with the CDN in the HTML part. When you type and send a message in the sendMessage function, you emit a message to the server. You can see that the same event name, chat-message, is used here. Now, you can see one more .on event, as we've seen in the server code. This event gets fired automatically when the server emits it. In that .on message, we are just appending the received message to the HTML. Now, let's see the console to understand how it works.
Inspection
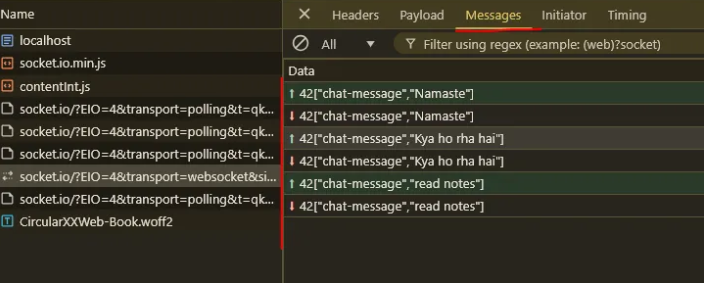
Let's check the browser's dev tools. When you first visit localhost:3000, in the screenshot below, you can see 101 Switching Protocols, where the HTTPS connection gets upgraded to WebSocket. This connection is long-lived until either party disconnects.

If you switch to the messages tab and then send a message from the UI, you will see the message count and the actual message in the screenshot below. Now, notice that this is a WebSocket connection, not an HTTPS connection anymore.
Now, the question arises: is this really worth it? You’re sending messages to everyone, so how does exclusivity work? Yes, this is not limited—WebSocket is vast. You can create rooms, send requests to only one user (one-to-one connection), group connections, and more. This was just an overview, so keep exploring and learning.
Remember: as the web has https and http, similarly with WebSockets, you have ws:// and wss://.
There is also a concept of framing, where we send data in chunks.
Use Cases
- Chat apps
- Analytics
- Financial trading
- Online gaming
- Collaborations
Challenges
- It uses a lot of resources based on the number of users due to long-lived connections.
- Connection limits.
- Strict sessions (read about load balancers—Google it).
- Authentication can be a challenge (example it).
- Cache layers.
- Scaling issues (not as good as long-polling and short-polling).
- Testing and debugging.
- Backward compatibility: what if the connection gets disturbed?
- Resource cleanup.
Now, that's all for this blog. See you in the next one!
Also checkout :